End-To-End tests with Playwright
Use case: test a Magento 2 module
Introduction
Testing a Magento 2 module end-to-end with a tool like Playwright offers several advantages:
- User Experience (UX) Validation: End-to-end tests ensure that the user experience of your Magento 2 website is functioning correctly. Playwright can automate actions such as navigation, form filling, product selection, payment, etc., to verify that everything is working as expected from the user's perspective.
- Identifying Functionality Issues: By testing the entire user flow, you can identify functionality issues that may arise when different parts of your Magento 2 module interact with each other. This helps detect bugs and address them before they impact customers.
- Quality Assurance (QA): End-to-end tests are an integral part of quality assurance (QA) to ensure that your Magento 2 module meets quality standards and functions correctly. This can help prevent customer returns, reputation issues, and sales losses.
- Reducing Human Errors: Automating tests with Playwright reduces the potential for human errors during manual verification of each feature. Automated tests are also reproducible and can be run at any time.
- Time Savings: Automated tests save time compared to manual verification, especially when you need to perform regression testing with each update to your module. This accelerates the development process.
- Support for Different Browsers: Playwright supports multiple browsers, allowing you to test your Magento 2 module on different platforms and ensure it works correctly for all users, regardless of their configuration.
- Integration into CI/CD Process: You can integrate end-to-end tests with Playwright into your continuous integration/continuous delivery (CI/CD) process to automate module validation with each new version or update, ensuring greater stability of the final product.
Personal experience
Thanks ChatGPT, I couldn't have said it better myself. For the rest, I'll try to write myself, to make the subject a little more human, even if I have to admit that automated testing is more a matter for robots.
Here I'd like to share my experience and give an overview of how I use Playwright to test Magento 2 modules.
Of course, setting up such tests takes time, especially for the first module tested. But once you've done it for a module, it's often quite easy to transpose, and the satisfaction of knowing that your module works (at least within the limits of the tests you've written) is, in my opinion, well worth the time.
In short, the steps to be repeated are almost always the same:
- step 1: Install Magento 2
- step 2: Enable the module
- step 3: Test the module end-to-end:
- step 3-1: Go to the back office to activate the module's functionalities
- étape 3-2: Execute various front or backend actions and ensure that the result is in line with the expected result
- Repeat steps 3-1 and 3-2, modifying any configurations, as often as necessary.
If necessary, you can repeat steps 1, 2 and 3, modifying certain parameters of the test environment: versions of PHP, Nginx, Apache, Varnish, etc.
That's not the main purpose of this article, but as all the steps are scriptable and Playwright can be used in headless mode, these tests can be the subject of CI/CD automation. In the conclusion, you'll find a link to one of my GitHub actions as an example.
What interests us here is step 3 in particular:
Test a module with Playwright
Install Playwright
To install Playwright, reading the Playwright documentation is certainly the best thing to do.
For the first module tested, I just created a Test/EndToEnd folder in which I ran the command :
npm init playwright@latestWith this command, the necessary browsers are downloaded and the following files are created:
playwright.config.ts
package.json
package-lock.json
tests/
    example.spec.ts
tests-examples/
    demo-todo-app.spec.ts
Once that's done, you can start the fun by launching :
- headless tests
npx playwright test- headed tests
npx playwright test --headed- tests with Playwright UI
npx playwright test --uiThe playwright.config.ts file is, in my opinion, the most important, and an overview of possible settings can be found in the documentation.
For implementation in other modules, I often simply retrieve this configuration file, which I've modified to suit my needs, the package.json and a few other files that can be shared, and then run a yarn install in the folder.
Write a test
As indicated in documentation , a test is simply the sequence of the following two operations:
- perform an action: visit a page, click on a button, fill in a form, etc.
- validate an assertion: check that content is present on the page, verify that a url contains the correct parameter, etc.
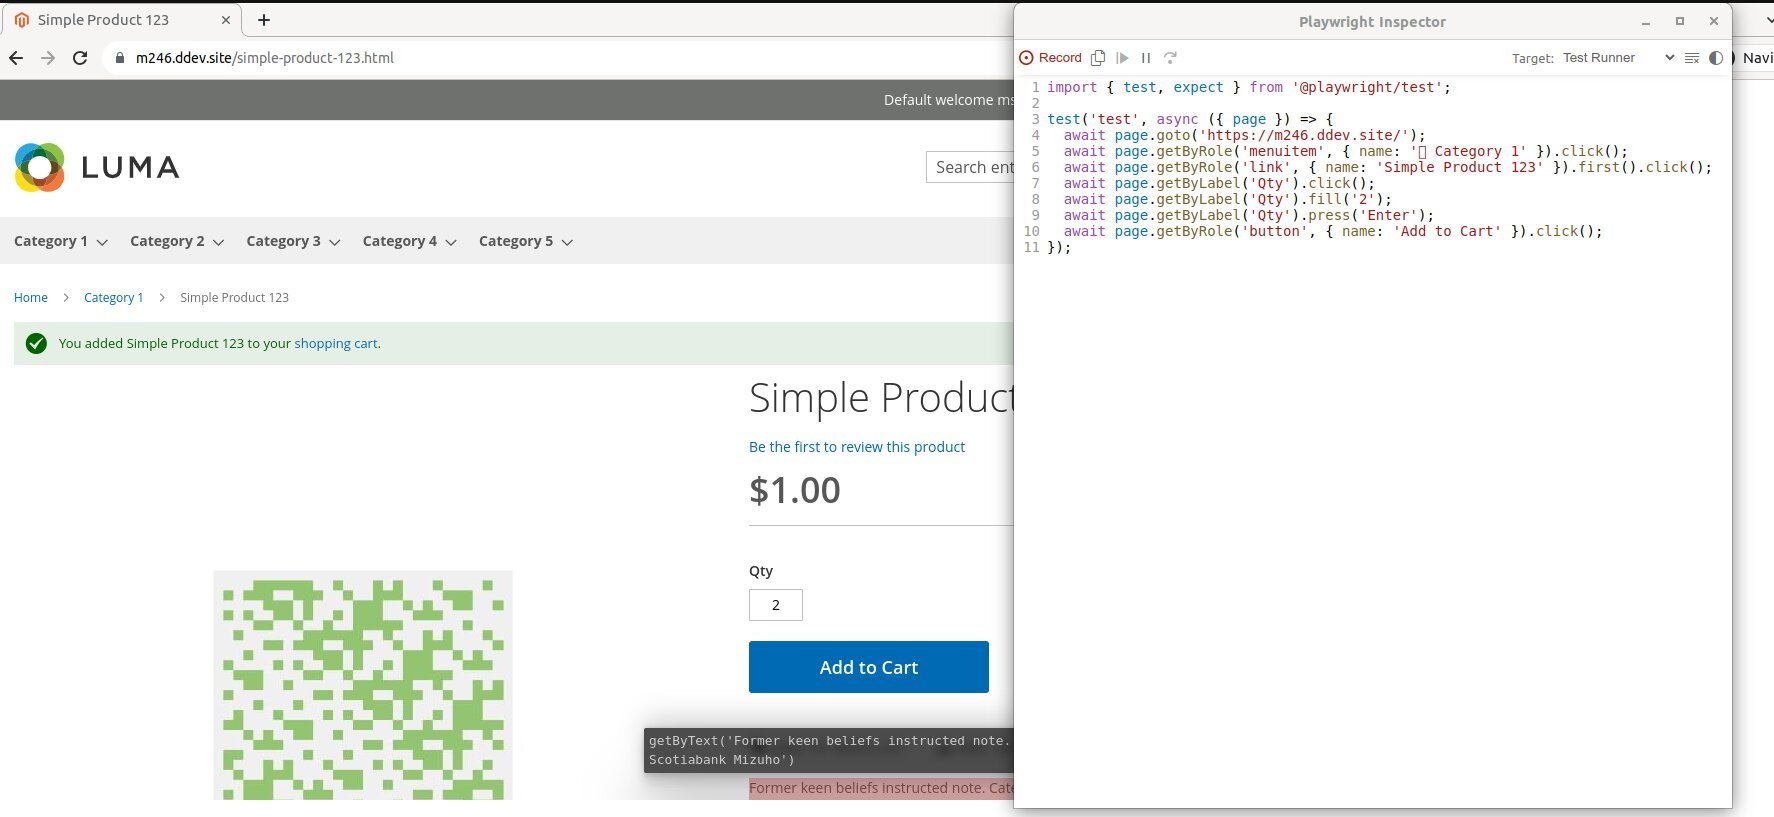
To make writing actions easier, Playwright offers a handy codegen command:
npx playwright codegenWith this command, a browser opens and each of your actions is transcribed into a "Playwright Inspector" window. All you have to do copy and paste all this so that your test performs exactly the same actions.
For example, the screenshot below shows the following sequence:
To get an idea of possible assertions: https://playwright.dev/docs/test-assertions.
Code organization: Page Object Model et Fixtures
What I have just described is more than enough to be able to test your module. But if you want to organize your code so that it can be reused more quickly, you can integrate the concepts of Page Object Model and Fixtures.
The basic idea behind the Page Object Model is that every visitable page should have a corresponding object, with a few properties and methods for testing purposes.
The purpose of the Fixtures principle is to control the starting environment (dataset, configuration, etc.) for each test or group of tests.
If you're really motivated, you could end up with code that resembles that of this Cypress repo with pretty folders of fixtures and object pages, and their possible variations by theme (Luma, Hyva, etc.). Sorry, this example is based on Cypress, Playwright's "competitor", but the principle remains the same and I haven't had the time to set up such a clean tree structure yet.
I'll include a few links to my current projects, and you'll be able to take a look at my fixtures and page-objects folders, which are much less extensive but consistent with my needs.
For example, the back office login page is an excellent candidate for becoming a "page object". Indeed, it's the only way to configure your module. So I've created an adminLoginPage object with basic methods whose names and contents will, I hope, be self-explanatory enough not to have to describe them here:
navigateTologinlogout
In the same vein, I have created objects for the homepage, product page, category page, the payment tunnel, and any other pages that may be useful in my tests, depending on the modules.
As promised, here is what it looks like for one of my modules which only requires the Luma theme for a category page and a few pages from the backend (login, cache, configuration, and category page editing):
Authentication management
As all my tests require me to connect to the back office, I've implemented one of the strategies suggested by Playwright to store and reuse the cookies that manage authentication.
As each test is run in an isolated context (equivalent to a new browser in private browsing), this step is necessary to avoid having to log in again before each new project test.
To do this, we modify the playwright.config.ts file and make all our test groups (called projects) dependent on a "setup" project in which:
- We visit the
adminLoginPagelogin page. - We enter the login/password of our test user.
- We log in and save the authentication status in a json file.
In this way, any test group will be preceded by a connection to the admin :
Use case: Okaeli_RoundPricesCut
The Okaeli_RoundPricesCut module serves the purpose of displaying rounded prices without decimals.
By default, a price of €15.00 is displayed as €15.00. This module allows it to be displayed as €15, which might not seem revolutionary but is a feature that has been frequently requested during my time working in web agencies. So, I developed this module.
Although straightforward, manual tests can be tedious and repetitive: one has to ensure that it works on category pages, product pages, for configurable product price options, during the checkout process, etc.
In this discussion, I will provide details only on the tests for configurable products and the checkout process as they give, in my opinion, a good overall idea of the testing scope.
Prerequisite
In order to always have the same test set, I install some Magento fixtures data:
bin/magento setup:performance:generate-fixtures setup/performance-toolkit/profiles/ce/small.xmlConfigurable Product Page Test
The test aims to navigate to a configurable product page to verify that everything proceeds as expected:
- If the feature is enabled, prices should be displayed without decimals.
- If the feature is disabled, prices should be displayed with decimals.
To achieve this, we can create a ConfigurableProductOnePage object that represents the configurable product page.
import { expect, Page } from "@playwright/test";

export default class ConfigurableProductOnePage {
    page: Page;
    url: string;

    constructor(page: Page) {
        this.url = "/configurable-product-1.html";
        this.page = page;
    }

    public async navigateTo(check = true) {
        await this.page.goto(this.url);
        if (check) {
            await expect(this.page).toHaveTitle(/Configurable Product 1/);
        }
    }
}
In practice, the test consists of several subtests:
- Test preparation
- We log in to the back office (see setup above).
- Test 1: Ensuring we can configure default module settings
- We navigate to the module's configuration page (
Catalog→Pricein this case). - We enable the feature on the front end.
- We clear the cache.
- We navigate to the module's configuration page (
In terms of code, it looks something like this:
test("can set default config", async ({
    adminOkaeliRoundPricesConfigPage,
    adminCachePage,
  }) => {
    await adminOkaeliRoundPricesConfigPage.setDefaultConfig();
    await adminCachePage.navigateTo();
    await adminCachePage.flushMagentoCache();
  });
- Test 2: Visiting the product Page with the feature enabled
- Navigating to a product page with a rounded base price.
- Verifying that the price display is consistent (no decimals).
- Changing the option (rounded price option).
- Verifying that the price display remains consistent (no decimals).
- Changing the option (non-rounded price option).
- Verifying that the price display is consistent (decimals are present).
The code associated with this test is as follows:
test("can see rounded prices on configurable product", async ({
  configurableProductOnePage,
  page,
}) => {
    await configurableProductOnePage.navigateTo();
    await expect(page.locator(".product-info-price")).toHaveText(/\$1/);
    await expect(page.locator(".product-info-price")).not.toHaveText(/\$1.00/);
    await page.locator("select").selectOption({ index: 1 });
    await expect(page.locator(".product-info-price")).toHaveText(/\$5/);
    await expect(page.locator(".product-info-price")).not.toHaveText(/\$5.00/);
    await page.locator("select").selectOption({ index: 8 });
    await expect(page.locator(".product-info-price")).toHaveText(/\$9.99/);
});
- Test 3: Visiting the product page with the feature deactivated
- Navigate to the module's configuration page.
- Disable the feature on the front end.
- Clear the cache.
- Repeat the same tests as in Test 2, expecting different results due to the feature being disabled.
As usual, here's the associated code:
test("can disable rounded prices on configurable product", async ({
  adminCachePage,
  adminOkaeliRoundPricesConfigPage,
  configurableProductOnePage,
  page,
}) => {
    await adminOkaeliRoundPricesConfigPage.disableFront();
    await adminCachePage.navigateTo();
    await adminCachePage.flushMagentoCache();
    await configurableProductOnePage.navigateTo();
    await expect(page.locator(".product-info-price")).toHaveText(/\$1.00/);
    await page.locator("select").selectOption({ index: 1 });
    await expect(page.locator(".product-info-price")).toHaveText(/\$5.00/);
    await page.locator("select").selectOption({ index: 8 });
    await expect(page.locator(".product-info-price")).toHaveText(/\$9.99/);
});
If errors are detected, a report can be consulted by launching :
npx playwright show-reportCheckout process test
To provide a more comprehensive overview, I'll briefly outline the test for price display during a purchase process. Similar to the product page test, it includes a preparation step, a configuration test, and two purchase journey tests – one with the feature enabled and one with the feature disabled. Here, I'll focus on the test with the feature enabled:
- Navigate to a simple product page.
- Add the product to the shopping cart.
- Verify the prices in the mini cart.
- Proceed to the checkout tunnel.
- Verify that the prices are displayed correctly.
- Fill in shipping information.
- Move to the next step (payment).
- Verify that the prices (product price, shipping fees, subtotal, total) are displayed correctly.
Note: The intentional slowing down of actions between each step has been added here for explanatory purposes. In practice, the test would run much faster.
Conclusion
This presentation merely skims the surface of Playwright's capabilities. Nevertheless, I hope it proves helpful if you ever consider giving this tool a chance.
As mentioned earlier, you can find an example of a GitHub action here in which I install a Magento 2 module and execute Playwright tests.