Magento 2 Marketplace
Module validation and test strategy
Table of Contents
Introduction
To make a module available on the Magento 2 Marketplace, you have to follow certain rules which you can find all the details here.
In summary, validation is done in two steps that can be separated: a marketing review and a technical review. Once these two reviews have been successfully completed, your module will be available on the Marketplace on the date you have indicated.
From my point of view, there are three situations that can lead you to submit a module:
- you want to make a new module available.
- you have updated a module and you want to submit a new version.
- a new version of Magento 2 has been released and you need to publish a compatible version.
This article is a feedback on the few Magento 2 module submissions I've done. After a quick review of the different elements needed to validate a module, I will talk about the testing strategy I adopted. In all that follows, I will take as an example a simple module called CategoryCode whose source code you can find here. This module itself does not matter; I submitted it in July 2022, but I am trying to generalize my approach here regarding the submission of any module.
Review process overview
You can start with the technical review, the marketing review or submit both in parallel, whichever makes the most sense to you. Personally, I usually start with the technical review, because it is the one that could be the most problematic.
Here, I prefer to start by talking about the marketing review:
Marketing review
For a complete description, you can refer to the official documentation.
It is essentially a matter of writing content (description of the module and PDF documents for the final users) to which is added a work on images creation.
In order to have all these chances on your side, it is better to follow the recommendations to the letter. In particular, you must provide the following:
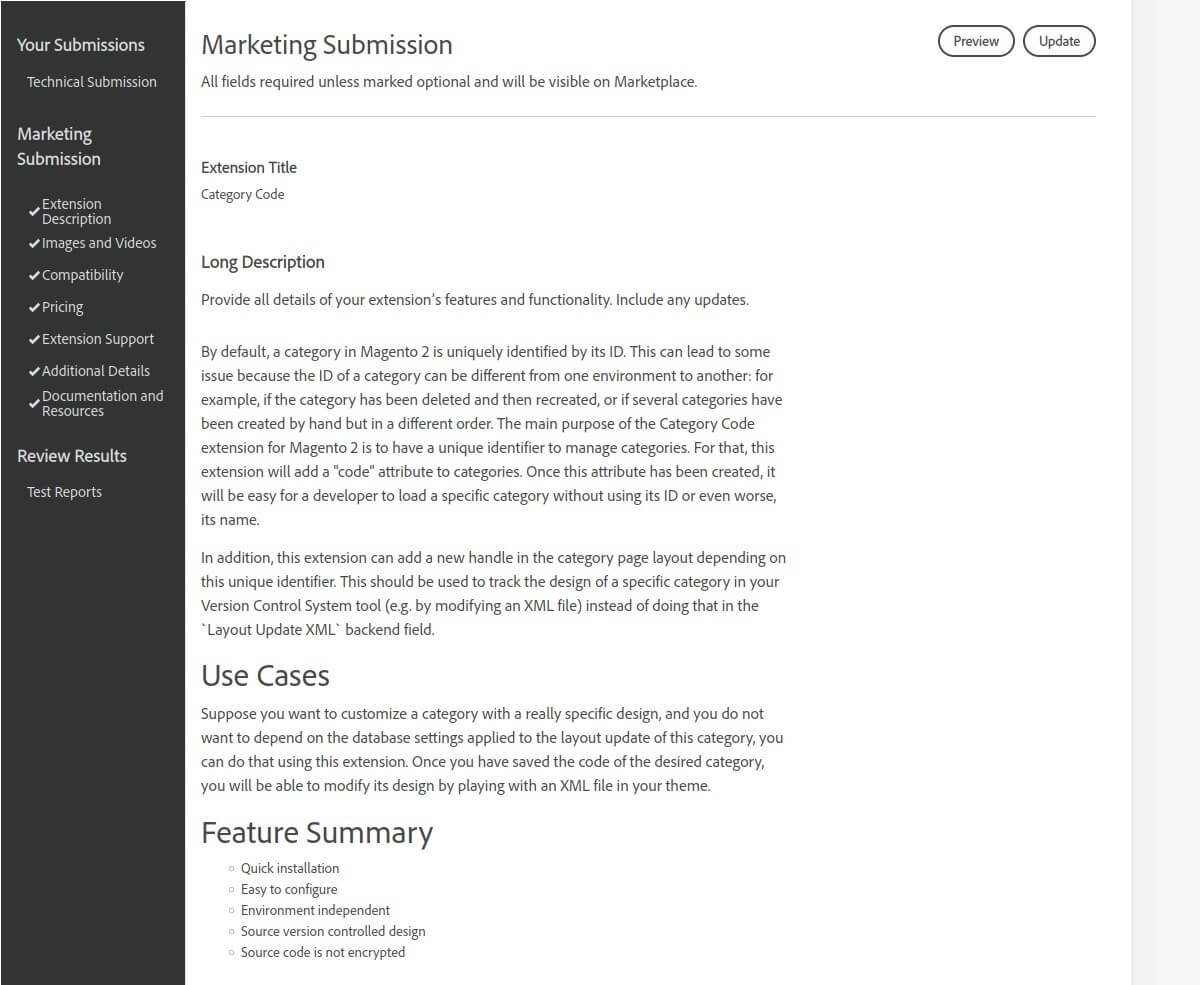
Long description
The long description must respect a certain formalism. It must highlight the main functionalities of the module and give some use cases.
Here is an overview of what has been accepted for the example module:
Logo
As a developer, creating a logo is not a task I was used to do and my first attempts ended in failure with the following explanation:
it must look professional and be a clear representation of the extension
The only advice I can give: as soon as your logo is accepted, save its template carefully so you can reuse it by simply changing the name of the concerned module.
The long awaited result:
![]()
Documents and resources
It is mandatory to provide at least one of the following three documents in PDF format:
- User's Guide
- Reference Manual
- Installation Guide
In order to optimize the work time on this task, I use two Markdown files which are already present in the
source code:
Installation_Guide.md
and
User_Guide.md
. For the marketing submission, I just have to use a tool to
convert the Markdown files to PDF.
You can see the PDF files of the example module here: Installation Guides and User Guides
That's all I can say about the marketing review. Now let's talk about the technical part.
Technical review
For a complete description, you can refer to the official documentation.
The steps are as follows:
- choose the compatible Magento 2 versions
- send a zip file containing the source code of your module
- series of automated tests
- manual tests.
Compatibility
Before you can submit a module, you must first determine the versions of Magento 2 for which you will ensure its compatibility:
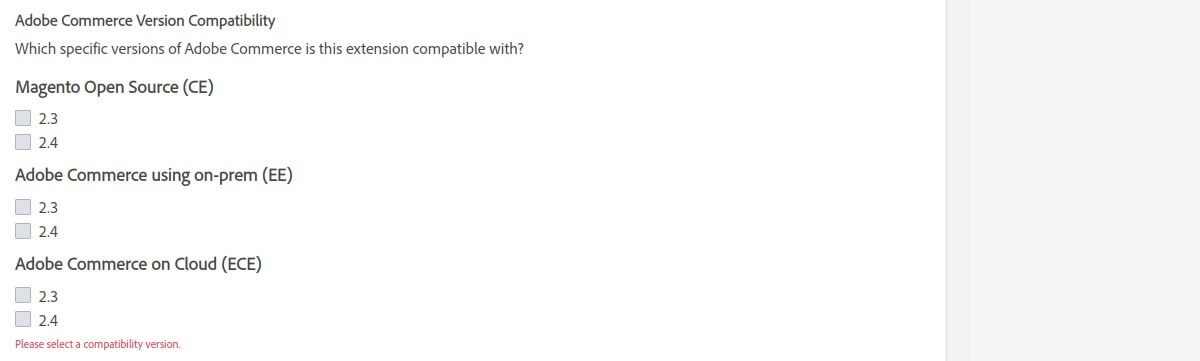
We will see later that this choice will of course have an impact on the tests to be implemented to ensure that your module works properly on all the chosen platforms.
Regarding the example module, I chose to ensure compatibility with Magento Open Source (CE) 2.3 and
2.4.
Code zip package
You must then provide a zip file containing its source code. You will need to adapt this type of command line :
zip -r vendor-name_package-name-1.0.0.zip package-path/ -x 'package-path/.git/*'Once your zip file is validated, a series of automated tests will be launched.
Code Sniffer
This is a static test of Magento 2 standards compliance with the
phpcs
tool.
The following command will be executed:
phpcs --standard=Magento2 --extensions=php,phtml --error-severity=10 --ignore-annotations --report=json --report-file=report.json <path-to-extension>If this test detects an Error anomaly, then your module will be rejected, and you will have to fix the errors
before you submit it again.
Installation & Varnish Test
This test is done in two parts:
- Installing the module and activating the production mode
- Adding the extension with
Composer(composer require <extension_package_name>) - Test module activation (
bin/magento module:enable <extension_name>) - Test compilation of the code (
bin/magento setup:di:compile) - Test deployment of static content (
bin/magento setup:static-content:deploy -f) - Activation of the "production" mode (
bin/magento deploy:mode:set production) - Re-indexing test (
bin/magento indexer:reindex)
- Adding the extension with
- Verification that the Varnish cache is working properly
- Double access to some product and category pages: the first access must give a
missand the second access ahit. - Access to the same product page after editing a product: the access must give a
miss. - Same check after a cleanup of the FPC cache.
- Double access to some product and category pages: the first access must give a
If this test does not pass, your module will be rejected, and you will have to correct the errors before submitting it again.
Other tests
There are other tests that I won't cover in detail here:
Malware scan: no virus in your zip file (validation required)MFTF Commerce-supplied tests: functional tests (validation not required at this time)MFTF Vendor-supplied tests: functional tests (validation not required at this time)Copy paste detector: Check that your code doesn't contain too much copy/paste from Magento 2 code (validation required)Semantic version check: Check that the version number submitted and the code changes compared to the previous version are consistent (validation required)
Once these automated tests are passed, a manual review (Manual QA) will be performed.
Manual QA
I'm not sure how this manual review is going. I already had some relevant feedback (a real bug was detected by the tester) but most of the time I don't get any feedback, and sometimes I wonder what is really tested.
Testing strategy
After this overview of the validation process, the following should give you an idea of how I test my developments before submission.
In fact, you will see that I add other tests to those imposed by the Marketplace. But it all depends on your requirements: do you just want to make sure that your module is accepted by the Marketplace or do you want to set up other tests in order to reduce the number of bugs to be treated afterwards.
In other words, we first need to define what to test, according to our requirements. This is the subject of the next part. Then, we have to ask ourselves the question: how to test?
Test plans
A test plan depends on the objectives you set.
Compatible versions of Magento 2
First, we have to ask ourselves on which versions of Magento 2 we want to test our module.
During the validation process of the Marketplace, we are offered several versions, but the tests will only take place on the latest release of a version. Indeed, here is what is mentioned on the Marketplace:
All tests were conducted on the latest versions of Adobe Commerce that existed for the compatible release lines at the moment of the extension submission. Latest versions of all other software were used, as applicable.
So, if we choose 2.4, the tests will be performed on a
version 2.4.4 (to date). Personally, when I say "2.4 compatible", I mean "compatible with 2.4.0, 2.4.1, 2.4.2,
2.4.3 and 2.4.4".
Similarly, for 2.3 compatibility: the tests will be run on a 2.3.7 version but what about
compatibility with all versions from 2.3.0 to 2.3.7?
Types of tests
Once the versions of Magento are chosen, we can focus on the types of tests themselves.
Static tests
The Code Sniffer test used for the technical review is a static test.
To pass the validation, it is enough that it does not detect any anomaly of type Error. Personally, I also try
to make sure that there are no anomalies, even of the Warning type.
To consolidate these static tests, I also add a test with the
phpmd
and
phpstan
tools.
Unit and integration tests
The Marketplace validation does not require any unit or integration tests. If the module contains them, I also add validation tests with PHPUNIT.
Functional tests
In a way, the Installation & Varnsh Test is a functional test: we make sure that the installation of the
module does not break some important processes.
I have not implemented the MTFT functional tests (see MTFT Magento and MTFT vendor), because they are still in beta version and are not
mandatory. This is clearly something to do in the future.
However, I have set up functional tests with other tools:
jest
and
playwright
. These JS libraries
libraries allow me to simulate interactions with a browser (various clicks, navigation) and to test the displays
(presence of some DOM elements, texts, etc). Being able to work in headless mode, these tests are
perfectly adapted to the GitHub actions that we will see later. Another important point is that they are easily
adaptable for developments outside Magento 2 (WordPress, Laravel or others).
System requirements compatibility
Finally, we can ask ourselves what versions of each element will make up the Magento 2 test environment: PHP version, Varnish version, ElasticSearch version, etc.
Indeed, depending on the version of Magento 2, you should theoretically test your module with potentially different versions of each element. For example, the documentation provides this type of table:
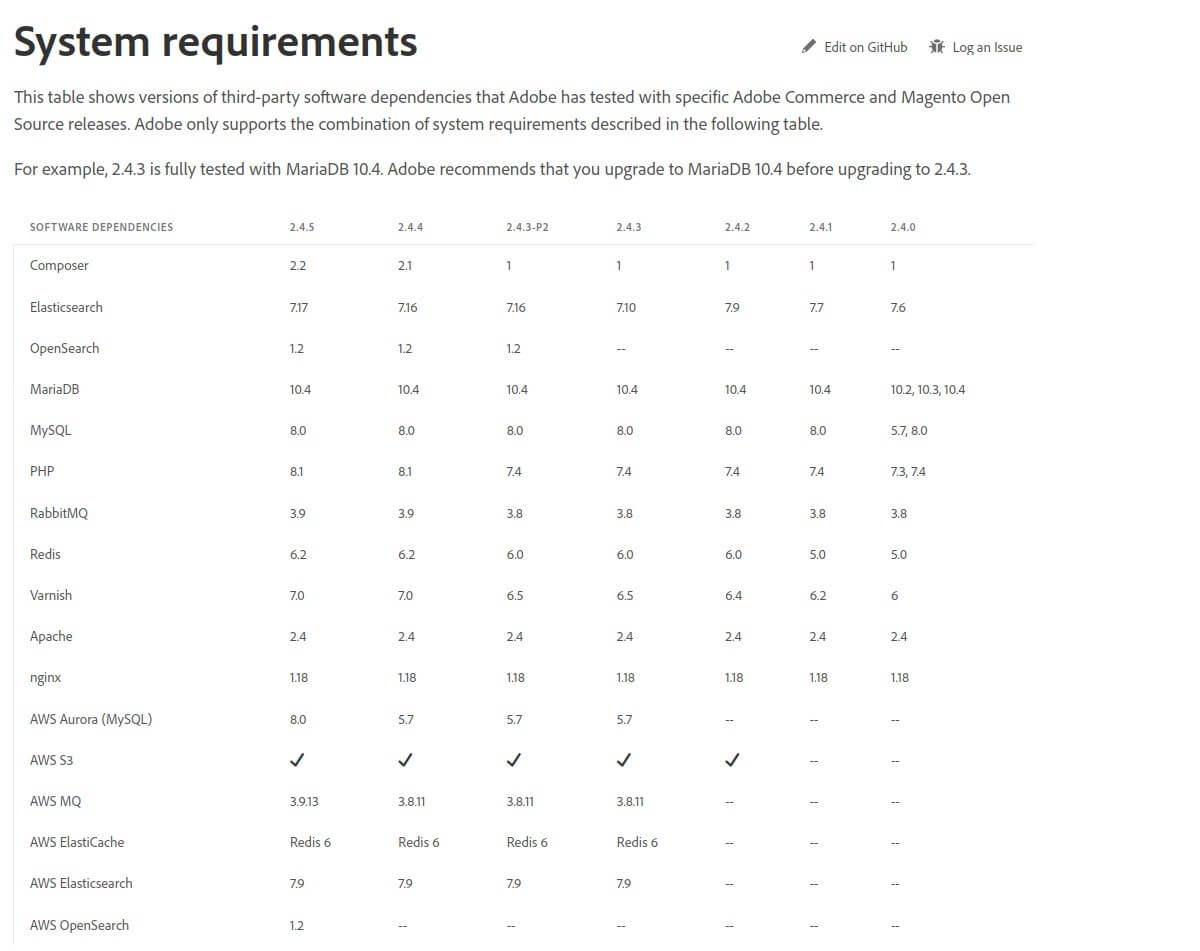
I will only talk about the PHP versions that need to be tested with your module, because in my case, it seems that it was the only thing that could be a problem. It all depends on the functionality of your module: if you think your module can be impacted by different versions of ElasticSearch, Varnish or others, you should do the same kind of work for each element.
Minimum requirements for PHP
As the validation only looks at the most up-to-date version of each element, this means that the checks took place on Magento 2.3.7 with PHP 7.4
and on Magento 2.4.4 with PHP 8.1.
This can be represented by the following list of combinations:
| Tests matrix | ||
|---|---|---|
| PHP 7.4 | PHP 8.1 | |
| Magento CE 2.3.7 | ✔ | |
| Magento CE 2.4.4 | ✔ |
Full PHP compatibility
From my point of view, this list is not quite complete, as it only gives the combinations officially supported by Adobe:
Adobe only supports the combination of system requirements described in the following table
In reality, the set of possible combinations is much larger. For example, Magento 2.4.4
is officially supported with PHP 8.1 but it is in fact fully compatible with PHP 7.4, as we can see
in the require part of its
composer.json
.
Thus, it is quite possible that your module is used on a version of Magento or PHP that has not been tested by the Marketplace. And if it has not been tested, nothing says that it is functional. So, to avoid any surprises, we could embark on more comprehensive tests.
The exhaustive list of "Magento 2 version / PHP version" combinations is as follows:
| Tests matrix | |||||
|---|---|---|---|---|---|
| PHP 7.1 | PHP 7.2 | PHP 7.3 | PHP 7.4 | PHP 8.1 | |
| Magento CE 2.3.0 | ✔ | ✔ | |||
| Magento CE 2.3.1 | ✔ | ✔ | |||
| Magento CE 2.3.2 | ✔ | ✔ | |||
| Magento CE 2.3.3 | ✔ | ✔ | ✔ | ||
| Magento CE 2.3.4 | ✔ | ✔ | ✔ | ||
| Magento CE 2.3.5 | ✔ | ✔ | ✔ | ||
| Magento CE 2.3.6 | ✔ | ✔ | ✔ | ||
| Magento CE 2.3.7 | ✔ | ✔ | |||
| Magento CE 2.4.0 | ✔ | ✔ | |||
| Magento CE 2.4.1 | ✔ | ✔ | |||
| Magento CE 2.4.2 | ✔ | ✔ | |||
| Magento CE 2.4.3 | ✔ | ✔ | |||
| Magento CE 2.4.4 | ✔ | ✔ |
That is a total of 30 combinations.
"Minimum required" test plan
Finally, if we only want to pass the validation, we should be satisfied with the following test plan:
- static
Code Sniffertest on Magento2.3.7with PHP7.4and on Magento2.4.4with PHP8.1 - functional test
Installation & Varnish Testwith the same combinations.
"Custom" test plan
Personally, I didn't want to ensure compatibility with PHP 7.1, and I didn't consider it relevant to test all possible combinations.
Finally, my test plan is as follows:
- static tests (
Code Sniffer,phpmdandphpstan): for Magento2.3.0,2.3.7,2.4.0and2.4.4with PHP7.2,7.3,7.4and8.1(7 combinations in total) - unit tests for the same combinations as the "Minimum Requirements" test plan.
Installation & Varnish Testfor the same combinations as the "Minimum Requirements" test plan.- functional
End-to-endtests for all versions of Magento2.3.7to2.4.4and PHP7.3,7.4and8.1(12 possible combinations)
Methodology
The question then arises: how to test?
When you see the list of tests in the "custom" test plan, you understand that it is not possible to do them manually, with each new validation. In fact, even in the case of the "minimum required" test plan, automation would seem to me to be a good choice.
Concretely, to be able to test a Magento 2 module in an automated way, we can rely on tools such as
Docker
to simulate a Magento 2 environment and we will essentially need the following services:
- a
webservice with nginx or apache and a certain version of PHP - a
dbservice with MariaDB for example - an
elasticsearchservice as it is mandatory since some time - a
varnishservice if we need to test the Varnish compatibility.
Once this environment is set up, we must be able to :
- create a Magento 2 project with
composer. - launch the Magento 2 installation with its CLI tool
bin/magento. - add its module as a
composerdependency. - run commands to activate the module.
- run various commands to execute other scripts (
composer,phpcs, custom scripts, etc.).
All these actions can be summarized in a sequence of command lines and are therefore quite automatable.
From my point of view, we need two types of tools:
- a tool to create and manipulate test environments.
- a tool to manage automation.
Personally, I chose DDEV for the management of environments and GitHub actions for the automation part.
Environment management : DDEV
In one of my previous article, I explained why and how I use DDEV.
In summary, DDEV allows to rely on a few configuration files to build working environments based on Docker containers. It will thus be enough to modify a simple file to be able to launch web environments with different versions of PHP. We can also create containers dedicated to other services with specific versions of the latter: ElasticSearch, Varnish, etc.
Above all, one of the interests of DDEV is that you can use it on your own machine: you can therefore completely launch the environments locally, test the module locally, and use the same command lines to implement GitHub actions.
Automation : GitHub actions
It's hard to describe all the power of GitHub actions. Here, I would like to
simply talk about the possibility to run several tests in parallel thanks to a directive called matrix.
For example, when I want to run the End-to-end functional tests of the example module,
I use this type of instruction:
matrix:
    m2-version: [ "2.3.7", "2.4.0", "2.4.1", "2.4.2", "2.4.3", "2.4.4" ]
    php-version: [ "7.2", "7.3", "7.4", "8.1" ]
    exclude:
        - { php-version: "7.2", m2-version: "2.3.7" }
        - { php-version: "8.1", m2-version: "2.3.7" }
        - { php-version: "7.2", m2-version: "2.4.0" }
        - { php-version: "8.1", m2-version: "2.4.0" }
        - { php-version: "7.2", m2-version: "2.4.1" }
        - { php-version: "8.1", m2-version: "2.4.1" }
        - { php-version: "7.2", m2-version: "2.4.2" }
        - { php-version: "8.1", m2-version: "2.4.2" }
        - { php-version: "7.2", m2-version: "2.4.3" }
        - { php-version: "8.1", m2-version: "2.4.3" }
        - { php-version: "7.2", m2-version: "2.4.4" }
        - { php-version: "7.3", m2-version: "2.4.4" }
This allows me to test, in parallel, the compatibility of the module for Magento versions from 2.3.7 to
2.4.4 with PHP versions from 7.2 to 8.1 :
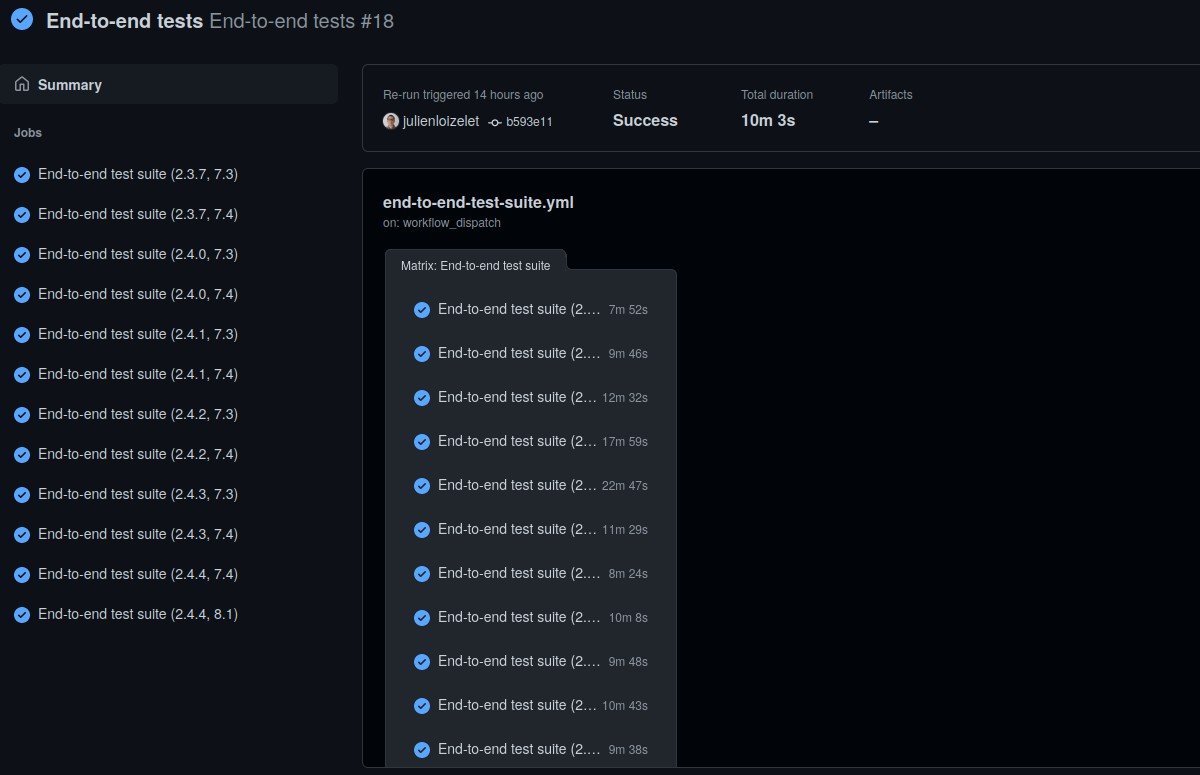
GitHub actions
To finish, I want to share here the finalized GitHub actions, which allow to meet the criteria of my test plan.
Code Sniffer and other static tests
You can see the details of the GitHub action here: Static tests
Finally, the line we are most interested in that simulates the Code Sniffer test is this one:
ddev phpcs vendor/${ { env.EXTENSION_PACKAGE_NAME } }
Installation & Varnish Test
The preparation required for this test, as well as the actual tests run, is described here.
Note that it will be necessary to :
- modify the Varnish acl to add an
X-EQP-CACHEheader. - install products and test categories with the
setup:performance:generate-fixturescommand. - call different urls several times to check that the
X-EQP-CACHEheader is reallyHITorMISS. depending on the case.
In order to call the different urls and check the conformity of the returns, I created a sh script that makes
calls curl.
You can see the details of the GitHub action here: Tests Installation & Varnish.
The Varnish tests are performed in the Varnish MISS and HIT test, Varnish product update test and
Varnish FPC clean test. The installation test is done in the Installation tests step.
Functional tests
You can see the details of the GitHub action here: End-to-end tests (see the steps
Configure test and Update layout handle test).
Again, this module is only given as an example. The idea is to test as many features as possible from start to finish: configuration of the module and verification that the actual results match those expected.
Unit and integration tests
The tests associated with the example module are almost non-existent, but the basic structure is there.
You can see the detail of the GitHub action here: Unit Tests
Code zip package
Finally, to make sure that the provided zip is valid, I set up a GitHub action allowing me to create a release and get the associated compliant zip. I use a copy of a GitHub project which, for some reason no longer exists: see here. So far, the files validated by this tool have been validated by the Marketplace.
You can see the details of the GitHub action here: Release and zip
Once my release is published on GitHub, I can get the zip and submit it directly.
Conclusion
I hope this presentation has taught you a little more about making a module available on the Marketplace and that you can pick up some ideas to set up your own testing methodology.
As for me, I have many areas of improvement in mind and continue to be curious about what is being done elsewhere. I imagine for example that a Github action using the API Marketplace EQP or that approaches like this one are to be studied in more detail.